Have you found a way to drive traffic to your blog but struggle to convert that traffic into email subscribers?
Email marketing is essential for growing your blog audience. It’s more effective than social media as a promotional tool and is a much more effective way to capture leads and convert them into customers.
It can be even a more effective way to keep your social media audience in the loop.
The hard part is figuring out the most effective way to grow your email list as fast as possible.
In this post, I share dozens of actionable tips you can use to build an email list that drives growth and increases your revenue.
Let’s go.
Start your email list in 5 simple steps:
- Choose/sign up for an email marketing service. I highly recommend MailerLite and Kit. I’ll share more details on those later in this post.
- Set up an email address to send mail from. You can create domain-based email addresses and aliases with Google Workspace or Zoho Mail. “newsletter@yourdomain.com” will suffice, but you can also use your name if you operate a personal brand, such as “adam@yourdomain.com”.
- Set up email authentication by adding SPF, DKIM and DMARC records in your domain’s DNS records.
- Set up an address by purchasing a PO Box or subscribing to a virtual mailbox service. If you choose Kit as your email marketing provider, you can use their mail address.
- Choose a recognizable sender name. I use “Adam @ Blogging Wizard”.
The two things every email list needs to succeed
Here’s what every email list needs to have in order to grow:
- An incentive to subscribe.
- An easy way to sign up.
First, website visitors need a reason to want to subscribe to your list. A simple blurb about “subscribing for updates” is not going to cut it.
Once you pique their interest, you need to make it easy for them to subscribe.
If your email form is too long or they need to click through too many screens to reach your form, you’re not going to see as many subscriptions as you’d like.
These two factors should be a priority as you work on optimizing your email marketing strategy.
The tips I share throughout this article are designed to help you achieve both.
Prime your email newsletter
1. Identify the goals you want to achieve with email marketing
Email marketing can help you achieve a lot. It can increase traffic to new blog posts, increase your conversion rate, drive sales for new products and more.
The best way to increase your return on investment (ROI) from email marketing is to first identify your goals.
Here are a few examples of goals you can set for yourself:
- Increase subscribers
- Increase sales
- Increase sales for a specific product or product category
- Drive blog traffic
- Earn more affiliate revenue
Identifying your goals before you optimize your email list will help you know exactly which strategies you need to implement and exactly what you need to optimize.
2. Choose an email marketing service that suits your goals
The best way to ensure you achieve your goals is by choosing products that have features that are designed to help you meet those goals.
If you want to increase your subscribers, choose an email marketing service that allows you to create email customizable forms and send lead magnets.
If you want to increase product sales, choose a service that allows you to add products and other ecommerce promotions to your emails.
The reason I recommend MailerLite is because it’s easy to use, offers a fantastic free tier and affordable paid tiers for small creators, comes with email templates and an intuitive drag-and-drop email builder, includes a visual automation builder, and has heaps of ecommerce features.
Kit is another popular option and they do offer a lot of subscribers on their free plan but there are a lot more feature restrictions than with MailerLite’s free plan.
Note: I use both tools for different projects. You can’t really go wrong with either.
3. Segment your email list
Similar to identifying your goals, if you identify the subgroups that exist within your audience, you’ll have an easier time coming up with ideas for products and content.
Not only will this help you create more targeted content, it’ll encourage the subscribers you do receive to stay subscribed.
Organize your audience into subgroups through email segmentation.
In MailerLite, you can create segments and groups. Other email marketing services might refer to groups as “tags.”
Use segments to divide your audience into different subgroups based on topics they’re interested in and their experience level.
For example, a guitar blog might create the following segments:
- Electric Guitar
- Acoustic Guitar
- Bass Guitar
- Beginner Guitarist
- Intermediate Guitarist
- Professional Guitarist
Use groups to assign different labels to your audience based on products they’ve purchased and other actions they take while subscribed to your list.
4. Create a custom thank you page
When you create an email opt-in form with MailerLite, you have the option to assign a custom success page to it.
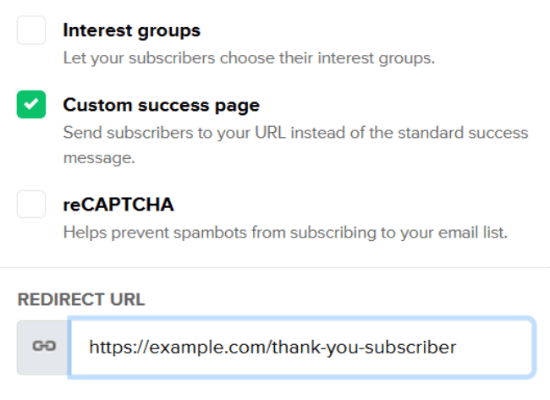
When a visitor uses this form to subscribe to your list, they’ll be redirected to whatever URL you assign here.
ConvertBox has this feature as well.
A great tactic to use here is to create a custom thank you page so you can genuinely thank your new subscriber for joining your email list.
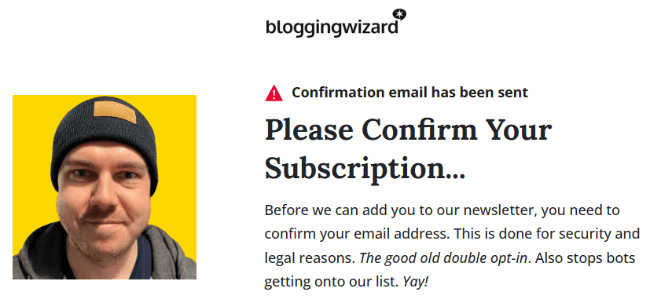
Encourage them to stay subscribed by also letting them know what to expect next from you, specifically an email asking them to confirm their subscription. Include images so your subscribers know exactly what they need to do.
Consider explaining your onboarding process as well.
Use a simple design for this page. Make sure it doesn’t have unnecessary distractions, and make sure your subscriber can’t access your lead magnet from here.
5. Create onboarding email sequences for new subscribers
If you haven’t figured it out by now, growing your email list is as much about ensuring new subscribers stay subscribed as it is about attracting them in the first place.
One way you can do that is by creating email sequences to welcome new subscribers and make sure they’re up to date with everything you offer.
In MailerLite, you can use automation workflows to set up email sequences.
Consider setting up the following email sequences:
- Welcome Sequence: Let subscribers know your publishing schedule, how to navigate your website, where you create content, what products you offer, and details about you and your team.
- Segment Sequence (Interest): Share your best content in a series of emails based on the interest groups you identified within your audience.
- Segment Sequence (Experience Level): Teach your audience how to do something that relates to their experience level in your niche.
- Ecommerce Sequence: You can promote products in your welcome email sequence, but you can also dedicate an entire email sequence to a specific product or service.
6. Activate double opt-in (not optional)
Another way to ensure new subscribers stay subscribed is to have them subscribe in a way that requires them to confirm their subscriptions.
Unsubscribe rates rise and open rates plummet when marketers use sneaky opt-in tactics.
While these techniques might increase the number of subscribers you receive, they do nothing to fill your list with subscribers who actually want to engage with your content and purchase your products.
Use the double opt-in tactic to have new subscribers confirm their subscriptions so you don’t surprise them with your first few emails.
This is also important to comply with specific laws such as GDPR, etc.
Note: I’m not a lawyer so don’t consider anything I say as legal advice. But you must use double opt-in. Not just because your email list will get better results, you need it in order to comply with laws like GDPR.
7. Create a custom confirmation page
Just like you can redirect subscribers to a custom thank you page, you can also redirect them to a custom confirmation page.
It’s simple, but letting your subscriber know their subscription has been confirmed is good for communication. They won’t need to worry about whether or not they’ll receive your first email.
Along with a link to your freebie, you can use a confirmation page to let your subscriber know about your publishing schedule, which social media platforms you’re active on and more.
8. Verify your subscribers
Just because your subscribers confirm their subscriptions, that doesn’t mean they’re necessarily legitimate.
The double opt-in tactic helps reduce the number of bots that are able to subscribe to your list, but it’s not foolproof.
Those bots skew your data and cost you money but it gets worse – they wreck your email deliverability rates.
Here’s how to stop that:
Use an email verification tool like Mailfloss to remove invalid email addresses from your list automatically.
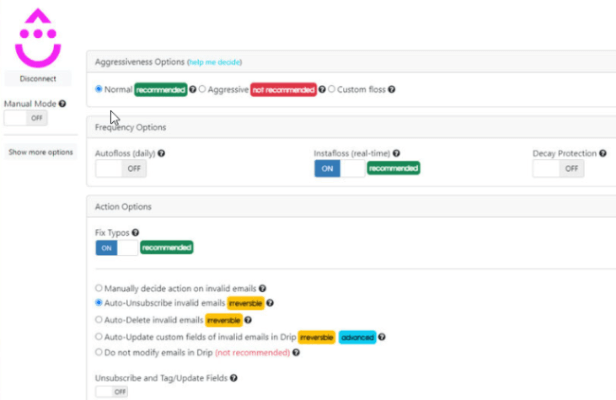
You can either run your email list through Mailfloss every 3-6 months or you can set up a direct integration with your email provider so it runs in real-time.
Optimize your website for newsletter signups
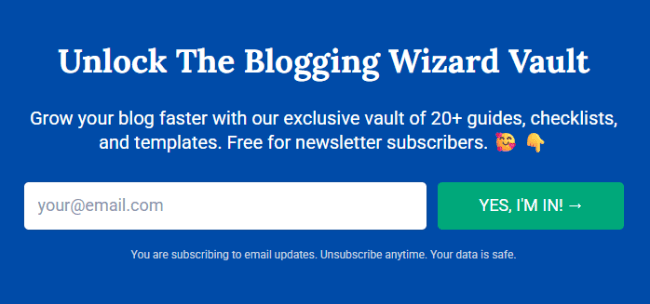
9. Simplify opt-in forms
These are the only elements the majority of opt-in forms need:
- Headline
- Subtitle
- Name field
- Email field
- Subscribe button
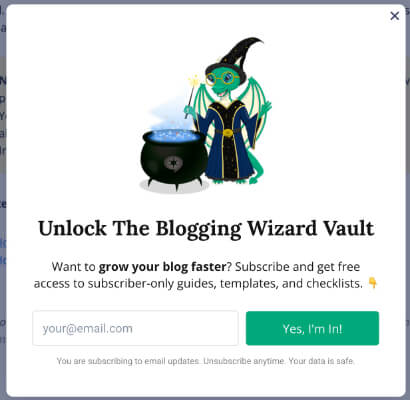
Adding an image will draw the reader’s attention to your form, but try not to add more than one.
Adding additional fields, especially fields that cause privacy concerns like last name, location and phone number, will cause fewer subscribes.
Here’s an example:
Other elements you may want to consider adding are a checkbox or disclosure that lets your new subscriber agree to your privacy policy (this makes your form GDPR compliant), a set of checkboxes your subscriber can use to self-segment themselves and a smaller subtitle that informs potential subscribers that they can unsubscribe anytime.
Your email marketing service will likely have a form builder you can use, but if you really want to drive growth, use a dedicated lead generation tool.
I cannot recommend ConvertBox enough.
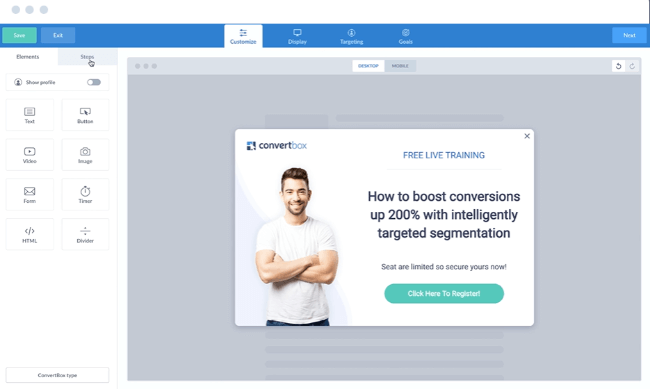
It offers multiple form types, a drag-and-drop form builder, numerous trigger options, and A/B split testing.
One thing I particularly like is how the form triggers work.
For example, I can set my popover to fire based on a combination of triggers. This includes exit intent, % scroll, inactivity on page, and more. I don’t just have to select one of these. I can select multiple.
10. Create a dedicated landing page for your newsletter
If you take a brief look at our main navigation menu, you’ll see a call to action (CTA) button labeled “Newsletter.”
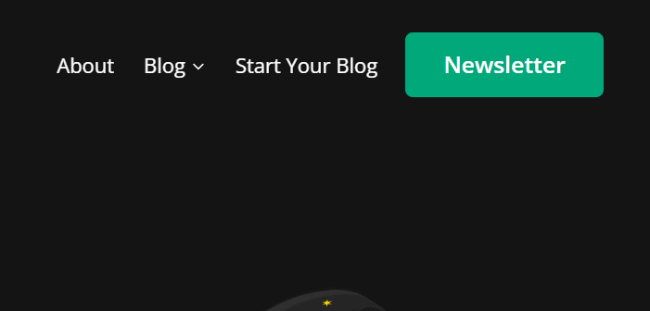
We also have a Subscribe CTA in our homepage’s hero section and a Subscribe link in our footer menu.
All of these buttons/links lead to our Subscribe page, a dedicated page on our website visitors can use to subscribe to the Blogging Wizard newsletter.
This page is a simple landing page that contains two opt-in forms (one at the top and another at the bottom), the names of publications where our business or content has been featured, and testimonials from readers and industry leaders.
I highly recommend creating a similar page for your own website.
Swipe Pages, OptimizePress (WordPress plugin) and other landing page builders are fantastic tools to use for this purpose.
Note: Compared to a lead magnet offer, this is a fairly weak CTA. Your lead magnets will convert better. But it’s also true that some readers just want to know how to subscribe to get email updates. So, this page caters to those readers. Your most loyal readers.
11. Add email opt-in forms in key locations on your website
If you want more email subscribers, you need to make your opt-in forms more visible.
I could just rely on Blogging Wizard’s primary Newsletter CTA for lead generation, but this isn’t good enough.
So, as you browse the Blogging Wizard website, you’ll find opt-in forms as pop-ups that appear on every page, a form at the bottom of our About page, a form at the bottom of our Blog page and a form at the bottom of every blog post we publish.
Here are opt-in form ideas to use on your website:
- Dedicated Subscribe landing page that features at least two opt-in forms. Be sure to link to it in your main navigation menu
- Pop-up that appears on every page
- Exit-intent pop-up that appears when visitors attempt to leave your website
- Opt-in form on your homepage and every key page of your website (About, Blog, etc.)
- Opt-in form in your sidebar
- Opt-in form in your footer
- Inline opt-in forms on blog post pages
- Link-trigger pop-up form
- Ribbon style form that features a simple opt-in form in a sticky header/footer bar
12. Create lead magnets
Lead magnets, also known as “opt-in incentives” are essential for lead generation. They give your visitors reasons to subscribe.
The way they work is simple: you promote a free offer to your visitor in exchange for their email address. They receive their free offer once they confirm their subscription.
The higher the perceived value and the more relevant to your audience, the better your lead magnet(s) will perform.
And there are generally two approaches that most creators will use.
You can either offer a library of resources or you can offer a single resource. The resource library approach offers extremely high perceived value. But after using this approach for over a decade, I can tell you that maintaining those resources can be extremely time consuming.
Offering a single resource allows you to focus on solving a very specific problem for your audience. Think about it: instead of trying to create multiple “good” resources, you can make one “great” resource.
Here are a few ideas:
- PDF guide
- Ebook
- Checklist
- Resource PDF or a cheatsheet
- Free course
- Workbook
- Whitepaper
- Case study
- Entire resource library
- Notion template
- Wallpaper, icon set or other downloadable product subscribers can use
Pick one of these ideas, and create at least one irresistible lead magnet idea for it.
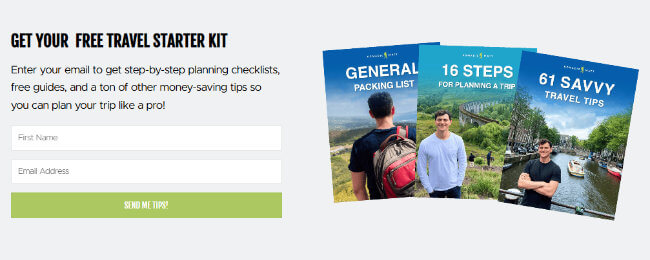
Travel blogger Nomadic Matt’s primary opt-in form promotes three free guides featuring a packing list, steps for planning a trip and savvy travel tips.
Note: Online courses typically have a higher perceived value than most types of lead magnets but they can be time consuming to create. PDF guides are the most common. You can increase the perceived value of those by incorporating templates & checklists directly into the PDF.
13. Create dedicated landing pages for primary lead magnets
I highly recommend creating dedicated landing pages for each primary lead magnet you offer.
Think of them as products you want your audience to purchase, only instead of making a purchase to receive them, they subscribe to your email list.
When you think of them in this way, it’s a lot easier to determine how to advertise them.
Along with promoting them in opt-in forms displayed in various sections of your website, you should also create dedicated landing pages for lead magnets.
Again, I highly recommend Swipe Pages for all landing pages and OptimizePress if you want a landing page builder specifically made for WordPress.
These tools have templates you can use to get landing pages up and running in a few short minutes.
No matter how you design your landing page, I highly recommend including the following sections:
- Hero section at the top that includes your opt-in form
- Opt-in form at the bottom
- A features/benefits section that explains the features your lead magnet offers and why each one would benefit your subscriber
- Testimonials, if relevant. This conveys show social proof
- Other benefits of subscribing to your email list
Use a simple design for this page, and make sure it uses the same styles as your website. This includes color and text.
14. Remove unnecessary distractions from your website
If you want more of your visitors to subscribe to your email list, you need to make it easier for them to access your opt-in forms.
This should be a problem with pop-up forms, but embedded forms and inline forms will be less visible if other elements capture your audience’s attention more.
This includes ads, cluttered sidebars and certain social media elements, such as a widget for your Instagram feed.
For ads, consider how much revenue they generate for you and whether or not they’re worth keeping.
For sidebars, either remove them entirely or simplify them. Only add widgets for an About Me blurb, your opt-in form, and maybe one element that promotes a product or affiliate link.
Note: Your blog should be the destination for your social media efforts. Don’t use your blog to build your audience on social. Instead, keep the focus on building your email list as much as possible.
15. Add an option to subscribe to contact forms
If you use a contact form on your website, consider giving senders a way to subscribe to your email list as they fill out your form.
This is something you can do with Kali Forms, a contact form plugin for WordPress.
It integrates with a number of different email marketing services.
16. Add an opt-in form to your 404 page
A 404 page is a custom page you can create for the 404 server code that displays if a URL a visitor tries to view doesn’t exist or no longer exists.
A lot of 404 pages have a simple “page not found” message, but it’s best to get a little more creative than that.
A search bar is the most obvious element to insert on this page. It gives your visitor another way to find what they were looking for.
Something else you can add to your 404 page is an opt-in form, especially one that promotes a lead magnet.
While they may not be able to find what they were looking for, they can at least gain access to a free offer.
Note: If you use WordPress, this page is created by default with a search bar added. For those of us that aren’t developers, some themes do provide a way to modify 404 error pages but it’s typically a premium feature.
Optimize your content for newsletter signups
17. Create exclusive content for your newsletter
One of the most effective ways to increase newsletter signups is by turning your newsletter into more of a dedicated content channel and less of a promotional tool for your blog.
For decades, bloggers and marketers alike have been taught to use their email lists as distribution tools for new blog posts, products and offers.
But if you publish exclusive content to your email list that your audience can only access if they subscribe, you give them more of an incentive to subscribe. And stay subscribed.
Since company news stories and personal updates don’t really contribute to your blog’s success in terms of traffic and SEO, consider using your newsletter to share these tidbits with your audience.
You can also publish mini guides, tutorials and reviews as emails.
18. Offer content upgrades
Content upgrades take the lead magnet concept to the next level.
The lead magnets we suggested creating should be far reaching. They should cover primary concepts and problems within your niche.
Content upgrades are different. They’re lead magnets that relate to the post they’re promoted on.
When a reader subscribes to receive a content upgrade, they’re “upgrading” the content experience by gaining access to a free resource that’ll help them understand the topic a little better.
So, you could either provide a downloadable copy of the blog post with extra insights. Or you could provide a specific resource that follows on from the blog post.
The key is to make your content upgrade the “logical next step” for readers to take once they get to the end of the blog post.
Let’s use a guitar blog as an example again. This blog has a post on the importance of practicing scales and even includes a few scales readers can use to practice.
A few content upgrades this blog could offer for this article include additional scales to practice, an exclusive video demonstrating how to play certain scales and a workbook readers can use to help them master scales.
19. Write better content
If you’re having an engagement issue on your website, it could be the result of poorly written content.
Readers subscribe to email lists for two reasons: either they want access to a free resource being offered or they truly connected with the content they read and genuinely want to read more of it.
If lead magnets and content upgrades aren’t enough to encourage readers to subscribe, they may not be enough to compensate for weak content.
Try to write in a way that’s more engaging. Use a concise and clear tone, and simplify your sentences.
Consider if your content gets right to the point or if there’s an entire essay before your post actually answers the question.
In this day and age, you’re competing with AI-generated content and short-form videos that answer questions in under a minute.
Put more of a personality into your writing, and try to give your readers an answer as quickly as possible.
Try inserting quick summaries toward the top of each article, even ones that are meant to be complete guides on certain topics.
20. Make your content easy to scan
It’s the 2020s. The majority of your readers are going to read your content on mobile devices. Make sure your content is readable.
If you use long paragraphs, no images, few headings, and no bullet points or numbered lists, you may make it very difficult for readers to scan your content.
One look at a “wall of text” will have your readers going back to where they came from as fast as they can.
Take a look at your content on your own mobile device to get an idea of the state your website’s design is in terms of body text.
Simplifying your sentences and the way you explain concepts and ideas will allow you to use shorter paragraphs.
You should also determine how to break topics up into smaller sections.
Always outline posts before you write. Try to use H2 and H3 headings in your posts. Only use headings H4, H5 and H6 headings if it makes sense to. In most cases, it won’t.
Headings should always be hierographical. H1 headings are for post titles. H2 headings are for main sections while H3 headings are for subsections.
H3 headings should only exist under H2 headings, H4 headings should only exist under H3 headings, etc.
The best thing you can do is turn some of the facts and concepts in your post into infographics or have more things be depicted in images.
21. Offer exclusive content on your website
Premium content is a fantastic way to encourage more of your readers to subscribe to your email newsletter, but it doesn’t have to only exist in emails.
You can also create what’s known as “gated content,” content that’s blocked to users who aren’t logged into your website.
Most websites lock gated content behind paid subscriptions, but you can also simply require readers to register to your site for free in order to access gated content.
Automations allow you to add new website users as subscribers to your email list.
22. Run contests
Contests, whether you host them on your blog or promote them on social media, are an easy way to increase the number of subscribers you have.
This is because contest tools, such as SweepWidget, allow you to create entry requirements participants must meet in order to enter.
Subscribing to your email list is one of them as is following you on specific social media platforms and liking certain posts.
Now, in terms of direct ways to build your email list – this is one of the most effective.
23. Create engaging quizzes
Have you ever taken a quiz on a website only to be met with a message that tells you need to enter your email address to have your results emailed to you?
It’s annoying, for sure, but it’s an effective way to grow an email list.
You can do the same on your website. Create fun and engaging quizzes for your audience, but require them to enter their email addresses in order to receive their results.
I highly recommend using a quiz maker like Woorise to create quizzes for your website. It has the ability to create personality quizzes, assessments and scored quizzes.
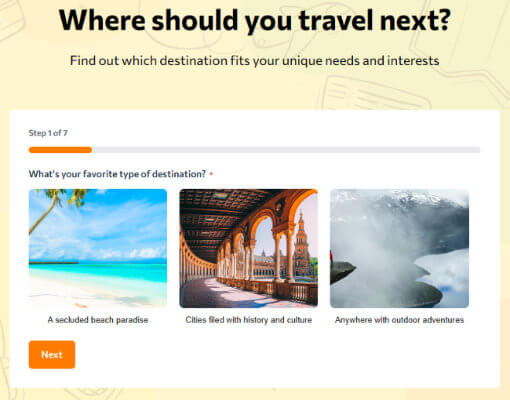
It uses a drag-and-drop builder, integrates with numerous email marketing tools, and includes analytics.
Optimize your ecommerce strategy for newsletter signups
24. Use free offers as opt-in incentives
If you offer digital products, you can offer a free version of your product as an opt-in incentive for signing up to your email list.
All ecommerce businesses have the opportunity to offer discounts as opt-in incentives. It’s common to see pop-ups for 10 or 15% off discounts when you browse online stores for the first time (or after clearing your cache).
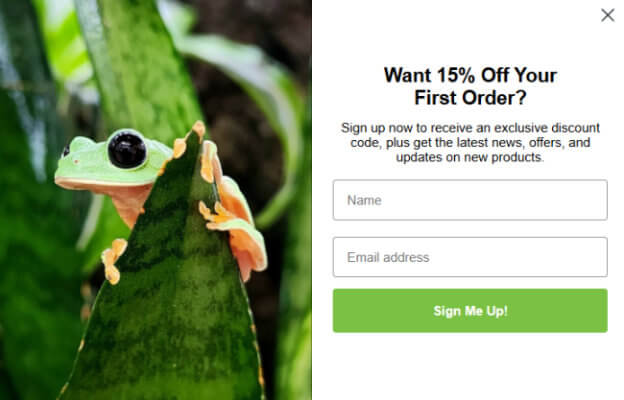
If you offer some sort of subscription, you can also offer a free trial as an opt-in incentive.
25. Collect email subscriptions upon payment
Again, as an ecommerce business, you need to be able to communicate with customers in order to send them receipts, order confirmations and shipping updates.
SMS exists, but the majority of these communications are done via email.
This entire process allows you to collect email subscriptions upon payment for products as your email marketing service should integrate with your ecommerce platform.
If you want to enhance your checkout experience and boost sales with a more robust sales funnel, use a solution like ThriveCart.
It’s especially designed for selling digital products and online courses.
26. Launch an affiliate program
There’s a reason why so many companies pay people to promote their products: it works!
By offering a creator a commission for every sale they generate for you, you encourage more creators to promote your products.
Not only will these affiliates become email subscribers, customers they refer will become subscribers as well.
There are numerous ways to launch affiliate programs, but if you do decide to sell products with ThriveCart, you can use their tool to launch an affiliate program pretty easily.
27. Add a wishlist functionality to your website
This one is specifically for those running an ecommerce store:
Some customers who visit your website won’t want to buy something right away. They’ll certainly be interested in your products, but for whatever reason, they won’t be quite ready to make a purchase.
In these instances, it really helps to at least have them create an account. That’s something a wishlist functionality can do.
Wishlists are useful tools shoppers can use to keep track of what they want to purchase from a store. In order to create and save a wishlist for your store, customers will need to create an account.
This gives you another opportunity to grow your email list. Each new user represents a new subscriber on your list.
28. Add a user-only section to your store
Another way to encourage visitors to create an account is by creating premium products only logged-in users can access.
This is similar to creating gated content on your website, only this involves gated products.
Again, each new user registration is another email subscriber for your list.
External list building tactics
Now, before we talk about monitoring and optimization, we need to talk about external tactics. What you can do outside of your website.
These are very straightforward so let’s raz through these. Consider this a checklist, if you will.
Tips #29-42:
- Encourage your subscribers to forward your emails.
- Add opt-in links to your email signature, link-in-bio page and YouTube video descriptions.
- Repurpose your best blog posts into social media content.
- Share newsletter teasers on social media.
- Promote your email list on the end screens of your YouTube videos.
- Promote gated content on social media.
- Promote your email list (or your lead magnet landing pages) in Instagram stories using the Swipe Up feature.
- Guest post to promote lead magnet landing pages.
- Run ads on social media and Google for lead magnets.
- Host webinars to draw attention to lead magnet landing pages.
- Set up interviews with relevant podcasts, and promote premium content from your email list or your lead magnets.
- Launch a co-marketing campaign with another business or creator.
- Promote your email list at in-person events.
- Add QR codes for your newsletter and/or lead magnets on physical products.
Ok, that’s it for the rapid fire “it does what it says on the tin” tactics.
Now, let’s take a look at how to monitor and optimize your email list building efforts.
Monitor & optimize
43. Set up email tracking
If you use an analytics tool like Google Analytics or Matomo Analytics, you can track email campaigns by adding special parameters to the URLs you promote in your emails.
Google Analytics calls these “UTM parameters” while Matomo Analytics simply calls them “campaign URLs.”
No matter which analytics tool you use, use it to set up and track campaigns in the following ways:
- See how many of your email subscribers click your blog links in emails
- See how many subscribers from a particular group click blog links
- Split test different email designs
- Find the right link placement or link style for blog links
44. Identify your best and worst lead generation pages
Your email service and email capture tool allow you to create numerous email forms. You can even name each one.
Use this nifty little feature to quickly see which pages generate the most and least number of subscribers for you.
For example, if you want to use the same email form on your homepage, About page and Blog page, create it, and add “Home” to its name. Then, duplicate it, and replace “Home” with “About”. Duplicate it again, and replace “About” with “Blog”.
It won’t tell you exactly why some pages perform better than others, but it’ll at least give you additional metrics to consider while you optimize your site.
45. Split test opt-in forms
Split testing, also known as “A/B split testing,” is a marketing technique in which you create two different versions of something, serve them to customers equally, and see which one performs better.
MailerLite and ConvertBox both allow you to split opt-in forms.
You should split test the following elements to see which ones perform the best:
- Design, including colors, typography and images (or no image)
- Types, including inline, pop-up, embedded or link trigger
- Button text, headlines and subtitles
- Form fields
When customers visit your website, they’ll see whichever form your opt-in tool serves them at random (Form A or Form B, hence the name “A/B split test”).
The final results of your split-test campaign will allow you to see which version(s) of your form performs better.
You can split test email campaigns as well, but this is an ongoing email marketing tactic rather than a lead generation strategy.
46. Split test lead magnets
While you split test opt-in form designs, you should also split test the lead magnets you offer.
You can either come up with two entirely different lead magnet ideas or create the same idea in two different ways.
The guitar blog I used as an example earlier could create two different lead magnets for their lesson on practicing scales: one as an ebook and one as a free course.
They’d use their opt-in tool’s split-test feature to offer the ebook on Form A and the free course on Form B.
Whichever form generates the most subscribers is the clear winner.
47. Split test landing page designs
If you create entire landing pages for your opt-in forms or lead magnets, you should definitely split test landing page designs as well.
It works in the same way as split testing opt-in forms does: you split test different colors, text and typography.
Because the design is obviously a lot larger, you can also split test its layout.
Try split testing a long landing page against a short landing page.
Both Swipe Pages and OptimizePress allow you to split test landing page designs. Again, I recommend Swipe Pages for all users and OptimizePress for WordPress users.
Why building an email list matters more than ever
Blogs and email marketing have always gone hand in hand. An email list has been the easiest way to keep your readers informed with everything you’ve got going on for decades.
With social media dominating online content and community building, you might be wondering if building an email list is even worth it in this day and age.
The truth is it’s never been more important.
Social media isn’t as intimate as email. When a viewer watches your content on TikTok or Instagram, they’re able to just scroll to the next video as quickly as they came across yours.
Short-form videos and TikTok’s scroll effect have taught social media users that if they don’t enjoy the content they’re watching, they can just scroll to whatever’s next.
And in some cases, social networks will completely hide your content from your subscribers/followers.
I’ve lost count of the people I follow on Instagram that get hidden from my feed. I mean, I chose to follow these people, so I should be able to see their content, right? Well, no. That’s not how most of these platforms work. Uggh 😳
Things are different with email.
No more third-party algo trying to hide the content you want and need to see.
You’re able to use a subject line to grab your reader’s attention, then combine captivating images with engaging text to truly connect with your reader on a more personal level.
Sure, in an inbox, you’re competing with receipts from online stores, promotions and personal emails, but it’s a lot better than competing with some of the biggest TikTok stars out there or whomever your reader has on their FYP.
If you operate an ecommerce business, your email list is your lifeline between your business and your customer base.
It’ll allow you to keep them informed about their orders, new product releases and any content you publish along the way.
If you aren’t seeing the results you want to see with email marketing, you need to take a step back, run a few tests, and see what’s going wrong.
Split test designs against one another, change the types of emails you send to your list, and don’t be afraid to consider the possibility that your content and/or products just aren’t compelling enough to generate engagement.
Use the tips I listed throughout this article to boost your growth once you figure out exactly what it is your audience wants.
Here are a few additional posts that might help you optimize your list:
Disclosure: Our content is reader-supported. If you click on certain links we may make a commission.